I recently finished a database intensive website using the Joomla content management system, and upon release the website popularity and therefore high database queries put quite a strain on the site which slowed it down more than usual. I try to develop websites to load as fast as possible, and with Google’s new “caffeine” release taking website speed into account it is all the more important.
In a situation like this one solution is to use website caching. Any database driven website (e.g. content managed), large or small, will benefit from using caching.
What is Caching?
Caching is when dynamic, database driven pages, such as those from a content managed website, are created as static HTML files on the server rather than pulled from the database every time someone requests a page. This means the page load times are much faster as no database queries or other script processing is performed.
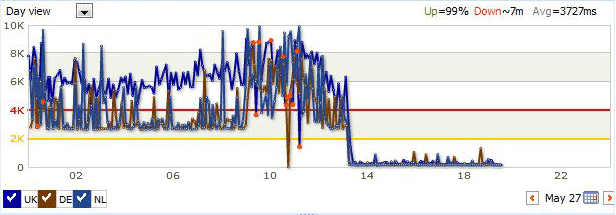
Take a look at this monitoring report for a website before and after enabling cache. As you can see there is a dramatic improvement in page load speed (the vertical axis is page load times, the horizontal is time of day). A reduction from approx. 3 seconds to 0.2 seconds from within the UK.
How Do I Enable Cache?
If you have a static website (plain HTML files, no content manager), then you do not need to do anything, cache is not required.
If you use a content management system, then cache is dependent upon your content management system, so speak to your web developer to ask them if such a cache system exists in your content manager.
If you use the Joomla content management system you will be pleased to know cache is built in and easily enabled.
- Go to Extensions -> Plugins -> System Cache
- Select the Yes radio button for Enabled
- Enter the Cache lifetime (see below for explanation)
- Click Save
That’s it!
What is Cache Lifetime?
Cache Lifetime is the time spent before the site performs a database query again and recreates the cached pages from the content. So any changes made will be shown after the lifetime expires. For a site that has infrequent content updates set the lifetime to a high number such as 24 hours or even 1 week (it’s in seconds), but if your site has regular content added or changed, then set it to a lower number, a number you are happy to wait before it re-generates, such as 1 hour or 15 minutes. If you have a busy site even 5 minutes will save a lot of database queries.
Resetting the Cache
Now your website pages will be saved on the server as HTML files rather than querying the database every time. This does have one drawback though, and that’s when you make a change in the editor, you will not see the change immediately on the site because it is showing a saved HTML page of before your change. You can either wait for the cache lifetime to expire and re-generate, or go to Tools -> Clean Cache and delete all the cached items to regenerate again. Then you will see your changes.
Beware of SEF
If you use a SEF component such as sh404SEF to make your URLs search engine friendly, make sure the SEF plugin is before the cache plugin else you may have problems with links.
Beware of Permissions
It’s possible you may have permissions issues which may disallow Joomla from deleting the cached files, especially if your FTP user owns all the files and not the server. If you have an failed to delete files error then you can enable FTP in the Joomla configuration so all file changes by Joomla will be performed by using the FTP user which may overcome file permissions issues.
You can do this by going to Site -> Global Configuration -> Server, and for FTP Settings choose Enable FTP Yes and enter the FTP details in the box. Click Save to save these details and you should be able to delete the Cached files.
Note: You should have the configuration.php file un-writeable for security, so you may also need to set this file to writeable using FTP first, save the above changes, then set the file back to un-writeable.